Sunday, October 28, 2012

A Homemade Birthday

Before her birthday month is over I want to share some pictures of the homemade birthday gifts that Miss D received for her 4th birthday. She is very much into mermaids right now so one night, on a whim, I drew up a template of a mermaid, scrounged around my sewing room for some scraps, and whipped up this cute, little mermaid doll. If you look real close, I'm sure you can find flaws, and I am not 100% satisfied with her proportions or the flimsiness of her neck, but all in all I think she's cute. Miss D seems to approve which is really all that matters anyway. Oh, and did I mention that she was completely FREE???  Her hair is made from a yellow hand towel scrap and her body is off white fleece scraps. Her tail and fins are cotton scraps, the flower embellishment was salvaged from a stained shirt and the ribbons and felt are all scraps I had on hand as well. She is also stuffed with stuffing from an old pillow. It only took me one night to embroider her face and another to put her together.
     Miss D's big gift this year that we had waiting downstairs for her when she woke up on her birthday was this upcycled dress up center or "magic mirror" as she likes to call it. We had a full length mirror in our basement collecting dust and after a little convincing, I got Mr. J to disassemble it and add to the rest of it with some wood from his very extensive collection. The dowel is a small piece we salvaged from my closet and the baskets were our original dress up storage solution gifted to the girls a few years ago. 
Front View
Hats in the top basket, shoes in the bottom basket
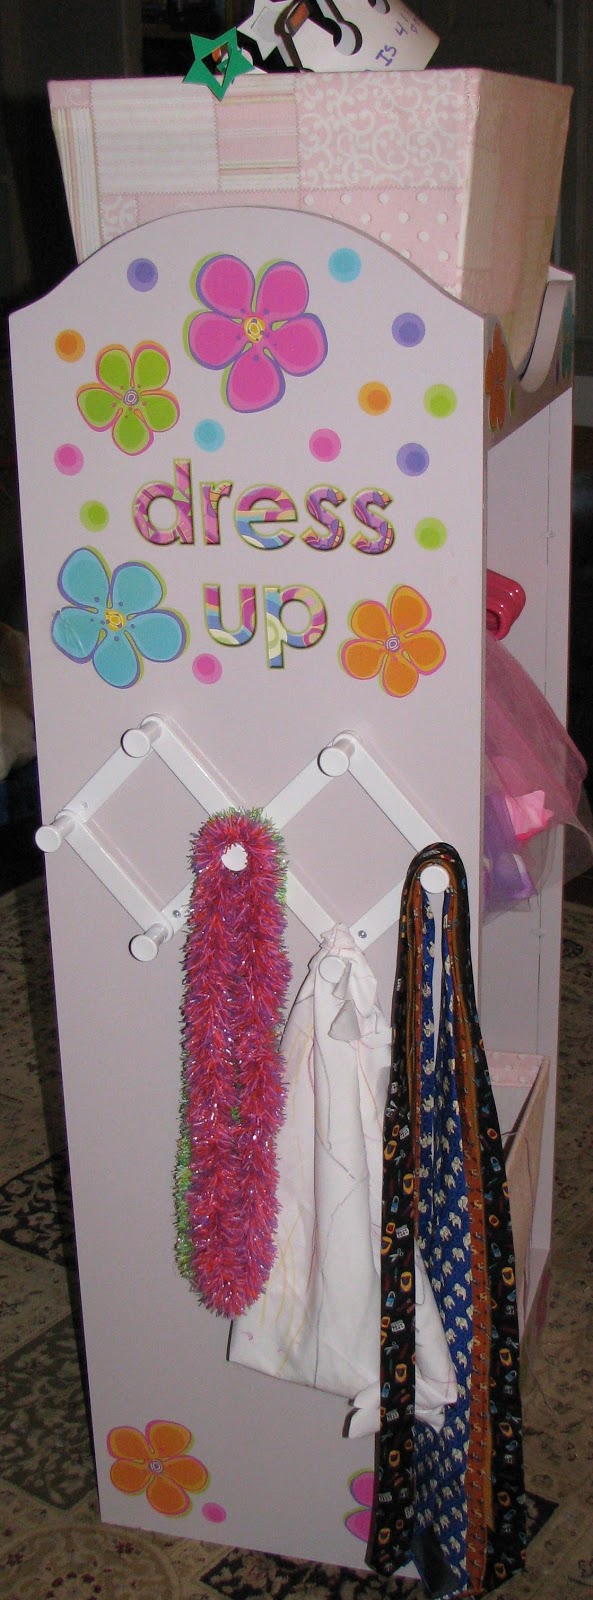
Side View
   It took Mr. J two evenings to put it together and then me another 2 evenings to paint it with some paint I already had on hand. I did end up spending $8 on the wall decals, white hooks and hangers, but considering that everything else was free, I'd say that's still a pretty good bargain!
  
     The kids loved the new "magic mirror" so much that I had to interrupt their play about 2 hours in on Miss D's birthday morning to get them to even consider eating breakfast (which was cake!!!) 

  Not a day has gone by so far that the new dress up center hasn't been played with and I don't see that changing any time soon. 
   This was our first completely homemade birthday and I have to say it was the most fun for me, by far. Miss E helped to decorate the mirror with the wall decals, and it was fun keeping the secret from Miss D until her birthday. I cannot wait to come up with more homemade gifts for Christmas and then for the other two kiddos' birthdays next year...


Saturday, October 27, 2012

Presents, Presents, and more Presents!


    October is a big birthday month for our family in the first place, but this year has been particularly eventful since it was also the month my grandparents celebrated their 60th wedding anniversary (which was actually on Sept. 1st,) as well as the month that dear, family friends of ours had a housewarming party to show off their beautiful, new home! So, with our very modest budget, I had to get really creative with all of our gift giving. I started a good month in advance to give myself plenty of time to really come up with unique, thoughtful, and fitting gifts for each individual and occasion. Miss D had a homemade birthday (see tomorrow's post for details) as well as my brother. I forgot to take pictures, but I made him fire starters out of dryer lint, wax and egg cartons, and the girls dug him up some "big, juicy worms" from our yard for fishing. We had fun decoupaging the container (an old pancake mix canister) for the fire starters and reporposed jar for the worms. I feel bad because it is definitely harder for me to come up with and make nice homemade gifts for men, and even though I'm sure he appreciated the effort, my brother did seem a little weirded out by our homemade gifts. Then again, who wouldn't be a little weirded out by worms?! 
     In an effort to make up for his lame gifts, I decided to make a birthday cake for my brother's birthday dinner celebration. One of his favorites is carrot cake, so I used our home grown carrots and homemade applesauce (in place of oil, which makes it SUPER moist) to make my go-to gluten free carrot cake recipe, and simply used food coloring to color the cream cheese frosting. The cream cheese frosting is a little bit harder to work with than decorator frosting, but it is much yummier so it's completely worth it! My mom always decorated our cakes for us when we were growing up, and I am certain that they were prettier but since I am not entering my cakes in a contest, I go for taste over beauty!
     I have really been getting into sewing lately, and since I have a few basics under my belt, I decided to venture out and try some more challenging techniques. With the next two projects, I tried my hand at reverse applique, which I LOVE to do! It's a bit more time consuming than regular applique, but I love the dimension it creates and for some reason I just enjoy doing fine, detail work, so it's right up my alley! I also gave quilting a try with this pillow that I made for my grandparents anniversary. Their first names both start with the letter M, so the "theme" of their party was m&m. My mother made cute little favors with custom made m&m's and I decided to follow the theme and make them a pillow. Over the summer they moved to a neighborhood in our town, only minutes away from our house, so I also thought it would be nice to make them something they could use in their new place.
     Now, back to the quilting...I stink at it! Oh. My. Gosh. One of my best friends makes beautiful quilted pillows and sells them in her Etsy shop, and after fighting with this lovely pillow for longer than I am willing to admit I am convinced that she should charge double what she does for them!!! I do think it came out okay in the end, and my grandparents seemed pleased with it, but I will probably not be attempting another one of these for a while.
    For our friends' housewarming party, I made them a set of monogrammed linen napkins, complete with upcycled napkin rings (from a cut up paper towel roll) that I decoupaged with coordinating fabric, ribbons and buttons. I put them all in a little, repurposed Easter basket and topped off the package with a cute, little, home grown butternut squash trimmed with craft supplies (flower, ribbon & fabric) that I had on hand.
      Again, I used reverse applique for the monogram on the napkins, but I also tried my hand at edging the two linen layers of the napkins with biased tape. The process involved an insane amount of pins, but after the first napkin, it became much easier, and I am surprisingly pleased with the results. I will definitely be making more things like this with bias tape, and I hope to get even more precise with the finished product over time. In fact, if I can perfect the process in time, I think that I will use some of the Christmas fabric that I stole acquired from my mother's stash to make some Christmas napkins and/or placemats for at least one of the three Yankee Swaps that we typically attend each year. 

Mrs. J :)

Tuesday, October 23, 2012

Hoppin' on the Farm Wagon!

   Montana is not the only new animal who joined our farm recently. Meet Hazel and Ivy, two Satin Rabbits that we plan to use as breeding does once they reach maturity. 
   Hazel is a 12 week old brown seal doe and Ivy is a 10 week old blue doe. They have been living in our basement in a temporary enclosure for several days and are definitely starting to warm up to everyone already. The girls are going to properly socialize these young ladies in no time! 
   We were supposed to get a buck as well, but the one we had picked out ended up being another doe after all, so we are going to wait a month or so for the next litter to be ready and hope for a buck that meets our needs. We are in no real hurry to start breeding as this will mainly serve as a hobby for Mrs J and the kids with the hope of many added benefits (but there will be more on that in later posts...)
   In preparation for starting this new endeavor we did our homework and visited several local rabbitries before settling on a breed. Satins are beautiful rabbits and are a fabulous dual purpose breed good for meat, pelts and as loving pets. They tend to eat less feed than the common meat rabbit breeds such as the New Zealand and Californian rabbits and in our humble opinion are much prettier to look at. That being said, because of how beautiful they are, it is definitely going to be a challenge to follow through with our intentions to slaughter them. Thankfully our hunter friend is willing to help us with this part in exchange for some healthy, all natural, (and delicious) rabbit meat.
   Before ultimately making the decision to raise rabbits on our homestead we bought some rabbit meat from a local rabbitry in order for everyone in the family to decide if they even liked the taste. 


   I simply seasoned the meat with salt and pepper, massaged it with olive oil, and marinaded it for 12 hours or so in the fridge in the olive oil and salt and pepper mixture. I peeled and cut up some of our garden fresh potatoes and carrots to roast along with the rabbit, sliced 1/2 sweet onion and minced 2 cloves of garlic,  mixed them with the juice of one lemon and used this onion, garlic, lemon juice mix to stuff the cavity of the rabbit. I then topped the rabbit with 3 strips of bacon for added fat (rabbit meat is very high in protein but has a very low fat content,) added 1/2 C. of water and 1/2 C. of apple juice to the roasting pan, topped the entire roast with rosemary and a little more salt and pepper. I roasted the rabbit at 350 degrees F for approx. 45 mins. In order to ensure that the rabbit didn't dry out I tented the rabbit with foil for the first 20 minutes and then removed the foil for the last 25 minutes. I removed the rabbit from the pan once it was done and returned the pan of vegetables to the oven to broil for about 5 minutes until the veggies were good  crispy! After EVERYONE in our family savored this delicious meal, the decision was essentially made and we found ourselves not 2 days later out "shopping" for our new rabbit friends. 


   It was a little weird to handle, season and cook a little bunny, but once I got past the idea, it really didn't feel much different than preparing chicken for dinner. It really helps that our little farm children seem to have a healthy handle on the "circle of life." In addition to being able to provide their growing bodies with nutritious, clean food, we are continually amazed by the countless life lessons that they are learning on our small farm in the woods.

Mrs. J :)


Thursday, October 18, 2012

New Goat

   Goldie’s crying finally got too much for us, and probably the neighbors, to take. It wasn't  so much, how much she cried, but when she did cry it wasn't normal. It sounds like a small child being murdered. The breeder was nice enough to take her back but had no goat to trade with us. She had a friend though, that was looking to down size her herd and had a couple of goats that we would be interested in. We dropped off Goldie at the breeder’s house and went to see the other goats. She had a beautiful doe, named Montana, who was two years old and very lovable  We fell in love with her right away. We end up pay for her and the breeder is going to let us use her buck this winter for giving her Goldie. I felt like a kid on the playground trading baseball cards, with all the deals we were making.  We loaded her up in the van and got her home right away. We put her in the pen with Aspen and they got along real quick, with no issues. After a day, we could see them playing by head butting each other. Montana is very beautiful and has a large stature; we think she’ll become the matriarch of the herd.

Tuesday, October 16, 2012

Two Out Of Three Ain't Bad

   This Saturday was the day the pigs went to the butcher. We ended up buying a one horse trailer to transport the pigs in, which we picked up on Thursday. I would've like to have more time to set up the trailer in front of the pen and give them some time to walk back and forth between the pen and trailer, but didn't have much time. I got up early Saturday morning to load up the pigs. I opened up the pen door and threw some feed on the ground to try to lure them into the trailer, I didn't feed them for a couple days to make sure they were good and hungry. The female who is the aggressive one, went first after about ten minutes of coaxing and was eating some feed in the trailer. The next to go was the spotted male, which wasn't as easy. After about twenty minutes, I finally got him past the door of the pen and he was hanging out in space between the pen and the trailer. I tried putting some rope around him to pull him but he just kicked and squirmed out of it. After another twenty minutes or so he finally decide to go into the trailer. My wife came out to help and said lets try to get the last one. I knew that the female was going to fill up on food and not want to stay in the trailer much longer and decided to call it because the other male was not even thinking about coming out of his pen. Of course this is the same pig that I had to chase through the woods, twice.
    The ride up to the butcher went well with no issues. Now when I go up this weekend  to pick up the meat I'm going to have to drop off the last pig also.

Friday, October 12, 2012

Three Big Pigs

   This is a video of the three pigs a couple of days before they go to the butcher. We've had a lot of rain in the last couple of weeks, and the pen is extremely muddy. They're eating the last of the broccoli plants from the garden. The screaming going on in the background is one of the goats.

Monday, October 8, 2012

Ghetto Garlic


We were inspired to plant garlic this year after reading a post from a blog,
http://lallybrochfarms.blogspot.com/2012/09/garlic-planting.html, and did it just a little different. The problem we had was all the garden space was already designated for different vegetables next year, except where the potato barrel was. So we decided to use the tires that were already there and fill them up with dirt that was in a pile next to the tires. I bought some New Hampshire native hard neck garlic from a local produce market and broke them up, and planted them in the dirt. We then shoveled about two inches thick of dirt on top of them. We were able to get seven cloves in each tire. After a couple of weeks or so, we'll put straw over the tires to insulate them for the winter. Of course Mr. T helped me out with the shoveling of the dirt.

Thursday, October 4, 2012

The Butcher Shop

    Well not really, most butcher shops don't have a garden hose and extension cords lying on the floor. I set up a make shift work station outside the chicken coop to butcher the chickens. If you notice, the patio umbrella is over the fire pit and chicken plucker, that's because both days I butchered the chickens it rained.
   I went back and forth on how to kill the chickens. I want it to be as painless as possible for the chickens and still make sure the meat was good. I finally decided to use the kill cones which hold the chickens upside down and you cut the jugular from the bottom, then gravity helps them bleed out. I did the first eight this way and it wasn't as peaceful as they say. They say they don't feel anything when this happens, but they would move and kick around and some of them were able to jump out of the cones and lie on the ground. I would have to pick them up and put them back in to finish dying. I didn't like how it was going so I did some more research on how to do it better. I came across a woman that would swing the chickens over her head and hit the chickens head on a saw horse, knocking them unconscious. I went with this idea, and took the chickens, held them upside for a little bit, this calms them down, and hit their head from behind with a dowel. When they were knocked out and in the kill cones, it made it a lot easier to cut their jugulars to bleed out. You want them to be a live so the heart pushes the blood out, and the chicken will store longer this way. The chickens didn't feel any pain this way except for the country music going on in the background; you're not really butchering chickens unless there is country music is playing.
   After the chickens completely bleed out, I would dip them in a pot of water that is around 160 degrees for half a minute or so. This loosens up the feathers so you can pluck them. I used a wood fire under the pot, and when I got to the right temp I slid it away from the fire. This worked out well.
   I used the homemade chicken plucker and found it to spin to fast and not do a good job. Sometimes it would peel the skin off and sometimes leave the first yellow layer of skin on. It didn't take all the feathers off leaving me to still go around by hand and pluck the feathers off. I'm going to make a different plucker for next year, the tub chicken plucker called the whizbang.


   After they were all plucked, I used my butcher table to cut them up. I won't go into details on how I did it, seeing how there are plenty of websites on how to do this. I did get pretty good at it though, and found it not to be as disgusting as it seems. When you see pictures of people doing this it looks bad, but when you doing it you're not thinking about it and you're just getting it done.
   Once butchered, I put them in plastic bags for the freezer. I took a tube and taped to the end of a vacuum cleaner, and put the tube inside the cavity of the bird while in the bag. I then spun the bag around the tube and turned on the vacuum cleaner. While the vacuum cleaner was still running, I quickly pulled the tube out and spun the bag tight as possible. Then put a zip tie on it to keep it close, this made it like a vacuumed sealed bag. I left the chickens out for a few hours to "age" before freezing them.
   After doing fourteen birds, I decided to take the birds to the butcher. The chicken plucker was not doing a good enough job, and I didn't want to spend all that time and money on the birds only to have crummy product. I felt like I knew what I was doing and was comfortable doing it except for the plucking, and it would take way too long to pluck by hand. Next year I'll have a tub plucker and be able to do it right. 


Monday, October 1, 2012

Homemade Chicken Plucker


  I'm going to butcher our own chickens this year, and needed to make a chicken plucker. I had up in my shop a spindle sander and made some changes to it to make a plucker out of it. I took the sandpaper of the part that had the brushes on it and built a box around it to keep the feathers down.
   I only did a few birds so far and it works pretty well. I would like to find a way to slow it down a bit because if I leave the bird in one place to long or push too hard, it will tear the skin a bit. With a little practice I'm sure I'll get the hang of it. With 50 birds to do, I'll have plenty of practice, that's for sure.